Laser cleaning is a key technology used in the manufacturing of electric vehicle (EV) stators. Parts such as stator connectors and hairpins must be cleaned prior to welding.
This can consist in:
Stripping the insulating layer from the tips of copper hairpins
Removing an epoxy coating in specific areas of the stator
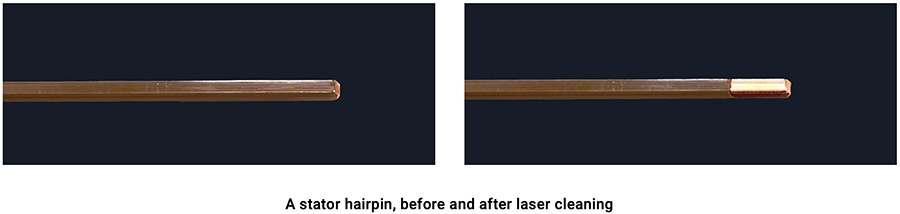
Optimizing the stator’s power density is key to achieving better efficiency. Power is conducted through copper wires called hairpins, which are bent at 180° to fit in minimal space when assembled in the stator. Each hairpin must be welded to the ones next to it, which requires removing insulation from the tips of hairpins to get a clean surface before welding.
This process called hairpin stripping can be performed with a laser. Copper hairpins are insulated by one of the following coatings:
Polyamide-imides (PAI)
Polyether ether ketone (PEEK)
Polyamide-imides with polyimide foil (PAI+FEP)
The laser process requires precise calibration to strip the coating from the hairpins by reaching the copper surface without leaving any residual coating. This must be achieved without damaging the copper’s integrity and with a fast cycle time.
In the following example, Laserax uses a 3kW laser to clean a zone of 6x13 mm on the hairpin with a cycle time of less than one second. This is achieved by cleaning the hairpin at a 45° angle from two different positions, each covering 1 large side and 1 small side of the hairpin. Each position requires 10 lasers passes, requiring less than half a second per position.
Hairpin Laser Cleaning Time at 3kW of Laser Power
Number of sides
Cleaning area (mm)
Cleaning time (s)
2
6x13
0.45
4
6x13 (x2)
0.90
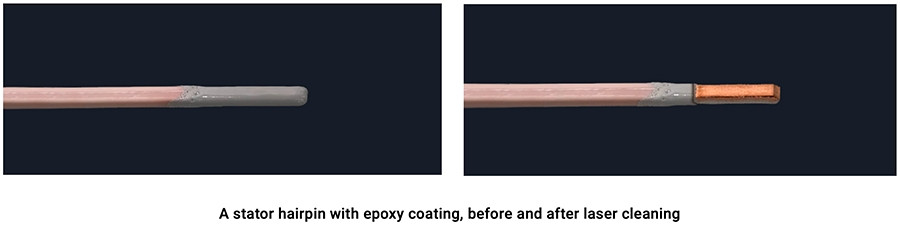
Removing Epoxy From Multiple Hairpins At Once
Some processes require that many hairpins be cleaned in a single operation to remove the coating after the impregnation process. To achieve this, the laser is moved at different angles and positions to clean all hairpins.
Our tests of a laser cleaning solution to remove epoxy from stator hairpins confirmed that up to 4 hairpins can be cleaned at the same time. This is achieved by cleaning the hairpins at a 45° angle from two different positions, each covering 1 large side and 1 small side of the hairpins. In this example, the two sides of each hairpin create an area of 19mm x 5mm, and each laser position requires 20 lasers passes.
Total Cleaning Time for 4 Hairpins at Different Power Levels
Laser power
Estimated cleaning time (s)
1kW
9.3
3kW
4.3
2kW
5.4
Removing Epoxy From Connector Tabs With A Laser
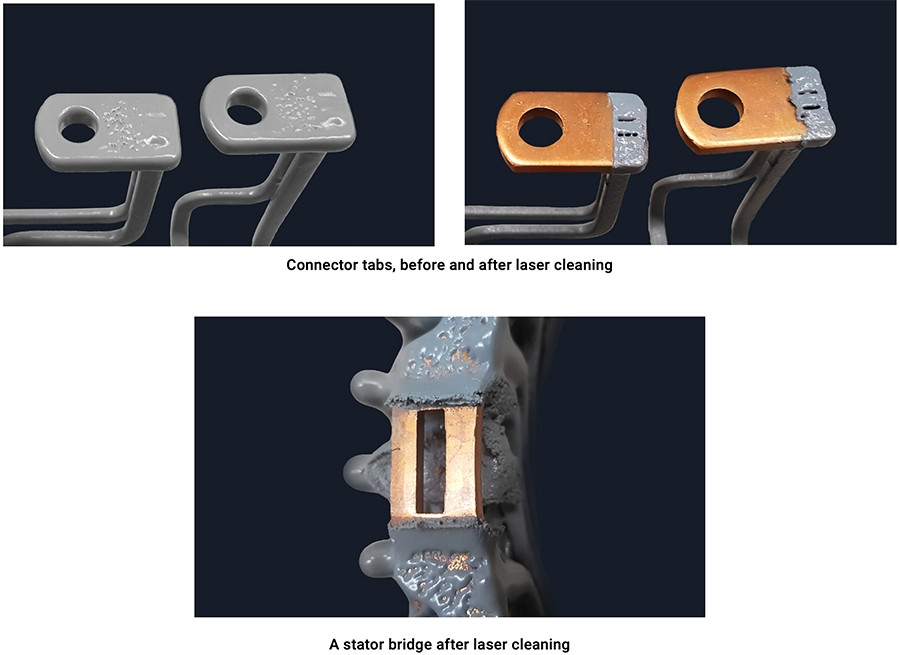
When the assembly of an electric motor stator is completed, it is immersed into an epoxy coating that isolates the stator’s conductive elements from dust, fluids and other contaminants. This ensures it is protected from outside elements that could affect performance.
After this impregnation process, the stator’s connector tabs might be coated with epoxy. Laser cleaning can be used to remove coating in specific areas to get clean copper surfaces prior to welding connectors to other parts of the e-motor.
The following example shows a laser solution to clean gray epoxy on a copper stator to replace a manual masking tape process. Three connector tabs and a bridge near the winded hairpins all needed to be cleaned with a target cycle time of 70 seconds.
Four parts need to be stripped of a thick epoxy in a short amount of time. The laser process can demand the installation of the laser head on an industrial robot and a 180° rotary table to move the stator and access every surface.
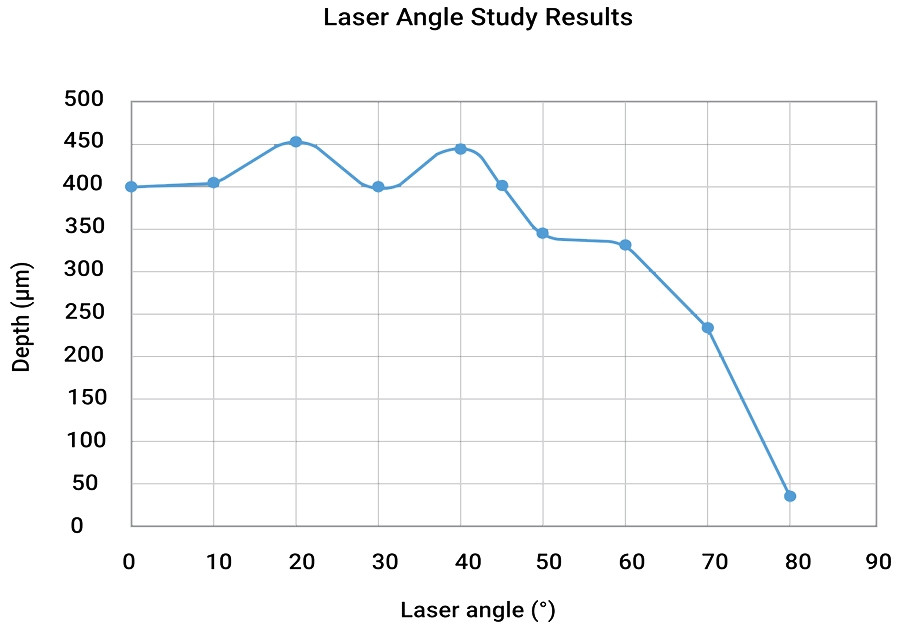
To avoid removing the coating from other parts of the stator, the laser angle must be adjusted. By measuring the depth (in microns) at different laser angles, Laserax obtained the following results. In this graphic, 0° represents a perpendicular, non-adjusted laser angle.
In this case, a 45° angle avoided removing coating from other parts of the stator and cleaned the connectors to perfection. The stator was on a table that made a 180° rotation to complete the cleaning on the other side of the connector’s inside walls.
This process optimization resulted in a cycle time of 70 seconds with a 500W laser, and 44 seconds with a 1kW laser.