Traceability and Laser Marking of Die Castings
Introduction
Part traceability is increasingly required not just for safety critical applications, but also for a growing number of applications along the entire value chain, and in multiple industries. Die castings are no exception. The structural/ high integrity market is the fastest growing market segment. It is no wonder then, that traceability and marking of die castings is becoming a hot topic. High integrity – and increasingly also conventional die cast parts – now have (individual) identification requirements for 100% of the parts produced. This not only allows immediate access to alloy and process data should there be an incident with the part, but it also helps to improve part quality, management, and logistics. These requirements are becoming increasingly important, both during the development process (for rapid identification of flaws and the resultant process parameter modifications), and for series production.1
Different technologies are commercially available, each with inherent pros and cons. When choosing the right technology to mark die castings, there are many requirements that can come into play. These include (a) short and demanding cycle times, (b) complex part surfaces that are not always flat, (c) elevated part temperatures during mark- ing, (d) surfaces that may be covered in lubricants and dirt, (e) the need for readability many years after application, (f ) lack of the possibility of appropriate fixturing and part posi- tioning for the traditionally thin “depth of focus” of early design laser markers or for any kind of pin markers, (g) a requirement for marks to be readable even after significant- ly aggressive post and pre-marking processes, such as shot blasting, painting, anodizing, and e-coating, sometimes in combination, and (h) significant financial and commercial concerns in a capital investment environment. Cycle time is key. Process complexity, capital and ongoing operational investments all need to be minimized. A marking system that works flawlessly regardless of tolerance variations, even at a substantial distance, non-contact and extremely repeatable and maintenance free would then be ideal. This can often make laser marking the only viable technology. Integration of laser markers requires proper application knowledge and experience, and careful adjustment of parameters. It is common that off-the-shelf products are not sufficient for a successful traceability project. Close co-operation with vendors and other technical experts can be important in achieving first and ongoing successes.
A Review of Marking Technologies
LABELS AND NAMEPLATES have been used for decades to identify parts. They consist of a printed substrate that is glued to the part surface. Such labels are no longer considered well suited for aluminum parts. They are rapidly being replaced. The reasons for this are numerous. Newer labeling methods attempt to eliminate the tendency of labels to fall off the “marked” parts either during subsequent process steps or while the parts are in use, but not always with success. These labels are often unreadable, and therefore the parts are irretrievable for inventory purposes. Further, there is a cost associated with consumables for label application and often added labor costs as well. Uneven and/or dirty part surfaces can also make these products difficult to apply. This can be compounded by high part temperatures of many aluminum parts, which further drive up the consumable costs when high-temperature papers and plastics are required.
INKJET PRINTING involves the use of a gun with a small, often microscopic, nozzle opening. Ink is directly applied to the part surface. While colored labels can be created (as with paper and plastic) and this can be quite useful, mark durability is dependent on the quality of the ink used and a great number of environmental factors. Ink can, for example, be affected by chemical aggression, simple solvents, mechanical abrasion, or simply smear before drying. Machining in CNC equipment and surface treatments such as shot blasting, washing, etching, and conversion coating can easily erase such marks, or at least render them very difficult to read. Increasingly, ink jet printing is being abandoned in die casting applications.
DIRECT MOLD MARKING (where marks are directly integrated into the die) is commonly used in die casting, although it is not sufficient in applications where each individual part must carry its own code. This method can be used to mark information such as the alloy used, the production facility involved, customer logo, or the day and shift the casting was produced at (but not typically the time or sequence). It can also carry information about the tool or cavity used. Direct mold marking is not used to identify individual part information, such as precise process parameters etc. for the integration of a 2D barcode on the part surface.
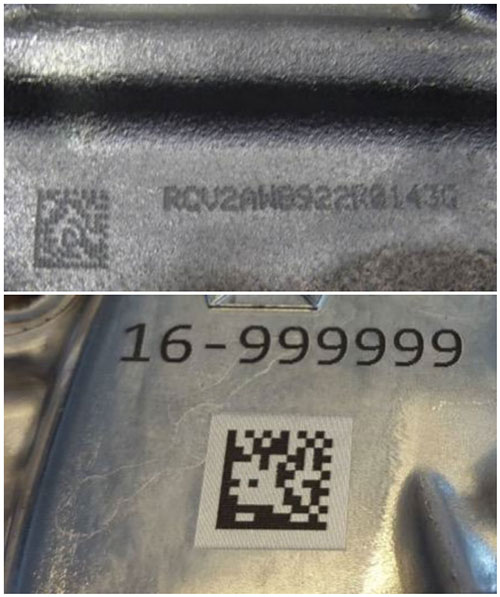
PIN STAMPING AND DOT PEEN MARKING are still commonly used technologies are still commonly used technologies for part marking and tracing of die castings, even today. By far the legacy method in favor, several disadvantages suggest that better methods may be available (apparent in figure 1). Identifiers applied through this method can be relatively robust since the mark is engraved deep in the material. Unfortunately, being mechanical, this process is relatively slow and even contributes to the scrap rate at the die caster when not perfectly repetitive. True contrast is not incorporated into the mark. Mechanical devices can typically only accommodate surface irregularities of up to ¼”. The uneven shape of die castings can interfere dimensionally with the pin marker’s requirements for physical space, since direct part contact is required, as is very demanding part positioning. In some cases, the surface alteration generated by the pin stamper can even exceed the surface quality specification for some die-cast parts.
LASER DIRECT PART MARKING is a very reliable, rapid and non-contact alternative to these “traditional” solutions. Consumable costs are reduced to zero, while contrast and readability are maximized.3 The marks produced are based on a surface modification that creates contrast.2 See Figure 1, bottom, for a laser mark on an aluminum die-cast part.
Lasers are capable of marking with great precision, even on uneven surfaces and at high temperatures, laser markers appear to be an excellent choice for direct part marking on die-cast parts of any alloy.4
Laser Marking Technology
To mark an identifier on metal, the high energy of an infrared pulsed fiber laser is used and is absorbed by the surface. In this manner, the minimum degradation energy threshold of the material is reached. Its surface is modified and therefore the manner it reflects ambient light. This creates a high contrast mark. The laser is computer controlled, making the marking of any feature effortless - a serial number, 2D barcode, 1D barcode, logo and more. Moreover, because the marking time depends among other things on the average power of the laser, it is simple to adapt the laser power to respect cycle time requirements at minimal cost.
Laser technology meets all of the criteria described above for identification of die-cast parts, ensuring reliably perfect traceability. Rough and contoured surfaces, often with a broad range and level of surface cleanliness, can all be reliably marked. Surfaces can even be etched, cleaned and slightly smoothed by the laser before the actual mark is applied. Whitening of the background and blackening of the barcode and text can be easily and quickly achieved in order to enhance readability.
Of course, there is no actual color applied in the process! The laser instead modifies the surface texture. The colors seen result when, after marking, at the microscopic level a certain amount of light is reflected in a diffuse way (to make it appear white) or is trapped between peaks and “valleys” (producing “black”). This effect can be produced while introducing a mere 0.1mm surface roughness, or less. The black features are usually raised compared to the rest of the surface, unless the part is later post-processed (e.g. shot blasting), in which case the mark needs to be protected by the surrounding surface. To achieve this, multiple laser passes are made in order to remove some material prior to the black marking process itself. The speeds utilized are then adjusted to obtain the desired contrast. Adjustments for surface temperatures and various alloys can also be made, (and usually with the benefit of reduced marking times!). Alloying ingredients, such as increased concentrations of silicon, can actually increase the contrast obtained with a given set of laser marking parameters. The temperature effect is particularly of interest for larger marks. The marking speed fortuitously can be increased along with metal temperature.
Laser Marking and Surface Treatments6
The effects of chromate coating and heat treatment on laser marked parts has already been extensively studied. Very little impact on the readability of laser marks was found given the proper selection of techniques and parameters. See figure 2:
In collaboration with Mercury Marine, an extensive study was conducted. The goal was to better understand readability and the influence of laser parameters on the robustness of laser markings following e-coating and shot blasting. The objective was to determine the optimum parameters for each process.
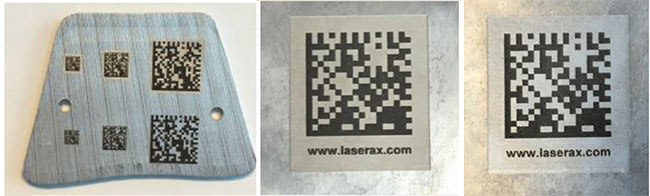
For the work described below, a Laserax LXQ-100 (100 W) fiber laser was used. A 2D DataMatrix code was marked on a Mercury Marine aluminum die casting in 362 alloy (a low iron, high silicon alloy). The laser operates at a wavelength of 1.06 μm, emitting pulses of 100 ns duration with a frequency of 100 kHz, providing an average power of 100 W. The readability of the marks produced was then studied following several post treatments: E coating alone, shot blasting alone, and shot blasting and E-coating combined.
For shot blasting, the technique known as “deep marking” is used.5 The mark is protected from the shot blast process by lowering the surface on which the “black” features are marked. To do so, multiple passes are made with the laser. Some material is thus removed before doing the blackening. If the cells produced are small enough and the edges surrounding them are sharp, the shots will simply not be able, shots will simply not be able to reach the black portions of the mark due to dimensional constraints, and it will remain intact. Surface marks were also tested. They were compared to deep ones. Where possible, surface marks are still advantageous compared to deep ones. It is much faster to mark without the deep etching step.
A multitude of parameters can affect the results; nevertheless, this study focuses on the following:
Test Parameters - Code Size, Cell Size and Depth, Background Color
For the deep-marked square 2D barcode, two different code sizes were used, of either approximately 13 mm or 16 mm side length. Three cell sizes were tested: 0.4 mm, 0.6 mm and 0.8 mm. The number of cells was adjusted to obtain the desired overall dimensions, either a total size of approximately 13 mm or 16 mm. Smaller cells allowed encoding of more information. This increased the redundancy in the encoding of the 2D code information.
On the other hand, larger cells are easier to read. For the surface marked 2D codes (no deep etching step), a larger dimension of 20mm x 20mm was used. These “standard” marks are much faster to make. Cell sizes from 0.5mm to 1.25mm were tested.
For standard applications without surface treatment, a white background provides better contrast and better readability. As shot blasting modifies the surface, this was not the case so the white backgrounds were not used in this circumstance. For e-coating, all samples were marked twice, both with and without white backgrounds, in order to study the effect of adding a background on readability. Data was collected using a Cognex Dataman 8050 reader. Each was read six times, from different orientations. The scanner then collected the value of the contrast and the unused error. The resultant contrast values were between 0 and 1 in order to define the brightness difference between the dark and pale part of the barcode. (A contrast as close to 1 as possible is desired.) The unused error, another characteristic of the scanned mark, is represented as a value between 0 and 100. This represents the extent of error correction needed to read the code. An unused error of 100 indicates that no error correction was necessary and therefore the code was not damaged at all. An unused error of more than 75 is considered satisfactory.
Post Treatment Process: Painting
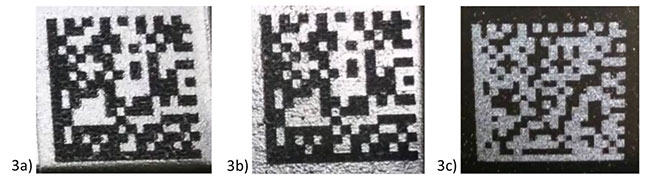
When scanning for readability after the painting process, it became clear early on that the cell size was very important for the readability of the Data Matrix codes. Of the four dimensions tested, only two resulted in 2D codes that were readable. Those with cell sizes of 0.5 mm and 0.75 mm were not readable regardless of the parameters used. It is clear that cell sizes of 0.75 mm and below are not suitable for this application. The influence of the marking parameters on the resistance to painting by the codes was also investigated. Two different marking speeds and three different line-spacings were studied. Each combination provided enough contrast to result in good readability. We did not see a significant difference among the results, indicating that the fastest parameters available should be selected. Figures 3a and 3b, respectively show the code after painting, with and without a white background.
A marking speed of 600 mm/s resulted in a marking time of 2 s, where cell sizes of 1 mm and 1.25 mm and a code size of 20 mm and line spacing of 0.175 mm were used. In these cases, the best contrast/unused error was 0.753/100, and the average contrast/unused error was 0.733/69. These parameters were found to be the most readable for resistance to E-coating. As shown in figure 3b, marking without a white background (at the fastest set of parameters) provided a good visual aspect and contrast, and was readable from 6 different angles. The unused error value of these marks was 100 - no error correction was necessary to read the code. These parameters are standard parameters used to mark aluminum. With them, it was also possible to read the code before the process of e-coat painting. It is indicated then, that laser marking is an effective solution for identification of parts in the die cast industry when e-coating processes are used in standard production.
Figure 3c shows a picture of the same barcode taken from a different angle. The contrast is also high, but note that the barcode is white while the background is black (inverted colors). Interestingly, this does not influence the readability of the code. This is because unlike a 1D code, only a difference in gray level is required to provide readability. No importance is given to color. This indicates then, that the angle at which the camera is located with respect to the illumination has a great impact on the observed result.
Post Treatment Process: Shot Blasting
Shot blasting is an abrasive treatment that changes the roughness of the surface. To resist the effects of this post-treatment, much deeper codes must be marked and the cell size must be selected according to the shot blast medium used. The individual cell size is an important factor influencing the readability of the 2D code after shot blasting. The marks done with 0.4 mm cells were not readable after the shot blast treatment. Yet the 0.6 mm and 0.8 mm cells were quite readable. Yet again, at 0.8 mm contrast was lost. Note that the average contrast before the shot blast process was 0.61, indicating that the contrast drop due to the shotblast process was only in the order of 10% or less.
The cycle time, of course, is dependent on the depth of marking. The number of passes used should be minimized where possible. There is a depth below which the mark is protected. It was observed that the fastest mark, using three laser passes, was not deep enough. It was erased. After 6 passes, these marks became readable, but a substantial amount of error correction was still needed. With 9 passes good results were achieved, both in contrast and unused correction error. With 12 passes, the contrast reached a maximum value - very close to the average contrast of 0.61 measured before the shot blast process. For the 6 different reading angles used, the contrast varied between 0.525 and 0.616 while the unused error was between 10 and 90. Using these parameters, 37 seconds was required to mark a 12.3mm Data Matrix code using the 100W laser. Such a code has a data capacity of 60 numeric characters or 43 alphanumeric characters.
Some applications may, of course, not allow such a long cycle time. Part marking should never be allowed to become the bottleneck in the manufacturing process. So in order to reduce marking time, we also tested the resistance of surface marking to shot blasting. Codes with 0.75 mm, 1.0 mm and 1.25 mm cell size were tested. Since shot blasting is an abrasive process, the surface marks were expected to be affected, with different contrast and readability. As seen with deep marking, the cell size influenced the results: Similar to the marks subjected to E-coating, cells of 0.75 mm were not readable. For the 1 mm and 1.25 mm cell sizes, the average contrast over six measurements were 0.363 and 0.362 respectively. The average contrast value before the post process was 0.72. The quality of the mark was sufficient for the reader to read it from the 6 different angles tested. But, as we expected, the contrast was low because the code was not protected unlike the one with the “deep” mark. If less contrast is acceptable, this method may be a good compromise alternative to deep marking where a shorter cycle time is required.
Post Treatment Process: Shot Blasting and Painting
After being shot blasted, the samples at Mercury Marine underwent an E-coating process. Paint changed the appearance of the marks and their readability. Figure 13 shows the evolution of the contrast through the sequence of post processes, for the optimal 0.6 mm cell size. Note the drop in contrast after shot blasting. However, the application of E-coat paint on the sample increased the contrast to even higher levels than before either post process. E-coating improves the contrast of marking after shot blast!
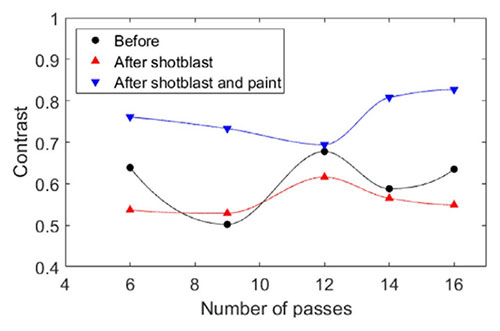
Figure 5 shows pictures of the 2D codes, with the number of passes and required marking time for each.
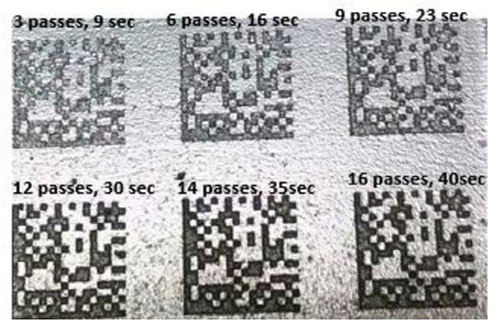
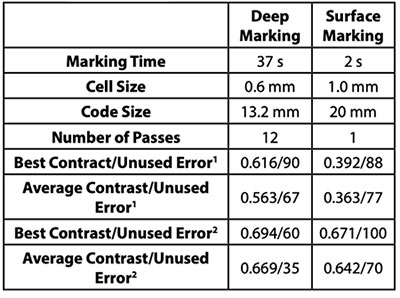
Table 1 is a summary of the best results for deep marking and surface marking, for the processes of shot blasting only and shot blasting + painting.
Conclusion
The demand for traceability continues to grow in the industry throughout the value chain. Most previously utilized marking technologies are unable to satisfy the need for short cycle times, reliability on rough, dirty, contoured or uneven surfaces, marking at high parts temperatures followed by subsequent heat and surface treatments. Laser marking is proving to be the optimal, indeed the only, technology to satisfy all of these challenges and other stringent requirements of the die casting industry. Although more costly in the initial investment required, and more demanding in terms of application know-how, laser marking is the best and most cost-effective technology available in the long term for any die caster, other metal processor or end user when reliable traceability of their products is required. Many “off the shelf” laser markers are now on the market, but it requires a significant amount of know-how to select the right technology, adjust all the parameters involved, determine the exact marking procedure and marking type, while integrating the laser marker into a die casting cell in a manner that guarantees Class 1 laser safety. The laser type and marking parameters used need to be adjusted to provide the required mark in the desired cycle time and setup/environment. Often the marks produced need to be adjusted to ensure the best readability after heat and surface treatment processes – and often the right compromise needs to be found between cycle time, required contrast and size of the marking.
References
1. S. Desrosiers et Al., Alloy and heat treatment development for weldable structure parts, 2014 Die Casting Congress conference proceedings
2. J. Maltais and al., Surface analysis study of laser marking of aluminum, submitted to ICSOBA 2016 conference proceedings
3. Alex Fraser and al., Important considerations for laser marking an identifier on aluminum, Light metals 2016 (Proceedings of TMS 2016), p. 261-264
4. J. Benes, The lowdown on laser marking, americanmachinist.com, March 25th, 2008
5. Fraser, A., Maltais, J., Hartlieb, M., Frayssinous, C., Vallée, R., Godmaire, X., “Review of technologies for identification of die casting parts,” NADCA Transactions 2016
6. A. Fraser and al., “Important considerations for laser marking an identifier on die casting parts” NADCA Transactions 2017